Finally, ready to get going on the Typhoon! All things in place, if you're wondering what that would include have a read in my Guides for building.
First thing to get done is the central, internal, structure including the cockpit. I first took some time to study the reference material (see post 1) to determine the right colours for the different parts. From most pictures it was quite clear that most of the internal stuff was bare aluminium. Mostly I usually paint details when they're still on the sprue an then touch them up when they're in place. Some areas can be hard to paint when they're in place. This time though I decided to glue together the main parts of the frame before painting.
First of all I glued the two parts of the front wing spar together using clamps to minimize any gaps. Slowly progressing step by step until frame 8 in the instruction leaflet letting the glue harden between every step. Some times it's a bit tricky to see exactly how the parts should fit together from the instructions but Airfix has put some effort in making the parts speak for the selves. If you dry fit the parts first it soon becomes evident how they should fit together.
Having done the Typhoon base frame it was time to give it some colour. I began with giving it a coat of Vallejo black primer as I was going to use metal colour. I mostly use primers from spay cans as I want an over all layer and don't want the hazzle of cleaning my air brush all the time. As you will find out during this series I rely heavily on Vallejo products when it comes to painting.
Next coat was a layer of Vallejo's Metal Colour Aluminium (77.701) applied with my air brush giving the whole structure a nice metal shine. Now it looks like something straight out of the factory or even cleaner than that. This is not the look I'm after though. So to complete the base frame I first used some Vallejo Wash Light Grey (76.515) to get some shades and then some Vallejo Engine Oil Stains (73.813) to get some realistic looking dirt on it.
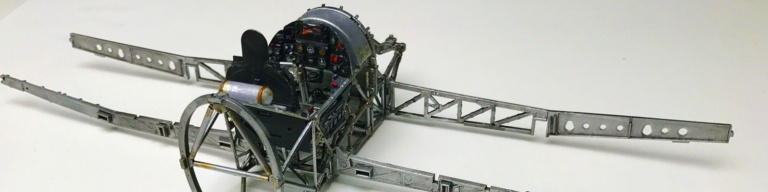
With the internal frame done it's time to start with the cockpit details. This is a place where you can easily go berserk in details. Questions that is valid in this circumstances are: How much will be visible after you've closed the fuselage? Where's the balance between scale accuracy and something visibly appealing? Or basically how far should you go?
Personally I have the view that I'm building for the fun of it and to that means that I put some extra effort into details that won't be visible afterwards. I also go for as accurate as possible but I'm also prepared to compromise and cut some corners.
I found the pilot seat in the kit detailed enough and decided to not buy a resin version available. Instead I bought some fabric seatbelts. When working in scale 1:24 this makes sense. Working in 1:48 I prefer the pre painted, etched, metal ones but here the fabric versions comes into their right. The pilot seat comes in four parts and the back rest with it's stuffed leather looks good when painted and weathered. Mounting the seat in the cockpit frame is a bit tricky as the parts it fits to is a bit wobbly. Give it time and when done handle it with care.
The fabric seatbelts I managed to get hold of must be made for the later 'car door' version of the Typhoon because the instructions does not quite adhere to the parts in the kit. With some reference pictures I think I made them fit with some creativity. Unfortunately I didn't read the instructions in detail first. Because of this I managed to fix some of the parts without removing the protecting paper on the back side. On the later parts I learnt this and then the belts really came into their right! Building in scale 1:24 I really recommend fabric seatbelts. As mentioned in the first post I used Eduard ED23020 - Fabric seat belts this time.
The side panels are well depicted with connecting tubes. Following the painting references in the instruction leaflet leaves you with quite a dull cockpit though. There is only one colour indicated per part even if you can suspect more from the way they are depicted in the instructions. As always reference pictures are a big help here. Using the pictures in The Hawker Typhoon Including the Hawker Tornado by Richard A. Franks and those found by simple Google searches I put the right colours to tubes, leavers and buttons. Doing this and adding some Vallejo Model Wash White (76.501) and carefully adding some wear with Tamiya Weathering Master Silver (ITEM87085) puts some life into it.
Lastly I arrived at the instrument panel. I had two choices, 1. the original panel in the kit with included decals for the instruments and 2. the Yahu Models YMA2405 - Instrument panel I'd bought extra. I was really into two moods here, I even considered cutting and filing and joining the two together. After consulting the The Scale Modelers Critique Group on Facebook, where I got a lot of good points, I decided to ditch the Yahu panel and go for the original version. The pre painted metal version simply was to flat. The kit version might be a bit exaggerated but it really looks better. Had I had more patience I would have ordered Airscale decals for the instruments, a tip I got at the 1/24 AIRFIX HAWKER TYPHOON MK.IB BUILDS group, but now I decided to head on.
Next post will be about constructing the engine.


