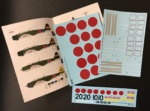
| Manufacturer | Hasegawa |
|---|---|
| Scale | 1/48 |
| Scale Mates model info | https://www.scalemates.com/kits/114360-hasegawa-09076-nakajima-b5n2-kate |
| Content in box | Instruction sheet, plastic kit, and decals for two individuals |
The Nakajima B5N Type 97 Kate flew as a prototype for the first time in 1937, it was to replace the Yokosuka B4Y as a torpedo bomber. It first saw action in the Sino-Japanese war and at the start of WWII it was the mainstay torpedo bomber in the Japanese Navy. The B5N2 Kate participated in the attack on Pearl Harbour on 7 December 1942 where it, amongst other things, was credited with the sinking of the battleship Arizona. As a torpedo bomber it strongly contributed in sinking the US carriers USS Lexington, USS Yorktown and USS Hornet. It was succeeded by the Nakajima B6N Jill later in the war but continued in roles as training, target towing and anti-submarine warfare. At the end of the war it was also used as Kamikaze aircraft as most older Japanese planes.
Hasegawa is alone with the B5N2 in scale 1/48, this kit has been released in many versions. This is the original kit, it has later been released in torpedo versions and also with new parts to be able to fold the wings. I did not manage to get hold of a version with torpedo so I got a B6N Jill to plunder a torpedo from as I wanted to do a Kate from the Battle Of Midway. This also meant that I needed other decals too. I also wanted to hot up the kit a bit so I bought a set of etched metal parts. These are the extras I used to the kit:
 |
 |
 |
 |
The cockpit is well detailed for a kit in this scale. There is decals for the instruments but I recommend you to file down the details on the panels before applying them as they are a bit raised. I used the pre painted etched metal part for them so in the pictures it's not the decal versions. To be honest the etched metal detailing felt a bit overdoing it this time, for two reasons: 1. The cockpit is really well detailed as it is. 2. When you've closed the fuselage not much of it is visible any ways. This is specially true if you use the closed cockpit hood.
The cockpit is housed in a separate tub that is then enclosed in the fuselage. It always makes me a bit nervous that the fuselage will be hard to close but this time the fit is perfect. The fuselage closes with minimal visible joints.
The wings is a quite simple story with one single under part and two upper. The air brakes are separate and can be placed in a normal position or extended. The rudders are not separate however but moulded to the wings. This also goes for the tailplane which are moulded in two, one for each side. The position lights in the wings are supplied as clear parts but you have to cut away space for them. I chose not to but just paint them onto the wings instead. To cut away and glue the clear parts to then paint them would have been a high risk affair.
 |
 |
 |
 |
Side stepping the landing gear until after the paint job I jumped to the engine. The parts are well moulded and okay in detail. Why they've chosen to make the front piece between the engine cowl and the cockpit as a separate part is a bit beyond me but as it fits quite well it doesn't matter too much. I also masked and glued all parts of the open cockpit hood except the pilots sliding part as they're quite hard to glue on after painting.
I decided to do some pre shading for this kit. This time however I tried doing it with oil paint and a brush. Not a good idea. It smears a lot and even after I sealed it with a coat of varnish some came of when I carefully removed masking later. Well, lesson learned. It came out okay anyway.
The colour scheme is a traditional grey and green Japanese Navy from the first half of the war. As usual I use Vallejo's Model Air colours.
Both of these are included in Vallejo´s Model Air set ‘Imperial Japanese Navy (IJN) Colors’ (ref. 71.169) which is handy if you’re doing more than one Japanese navy plane.
The engine cowl is a mix of 71.057 Black with a little 71.071 Artic Blue (Metallic) and some 71.073 Black (Metallic) to get the correct colour used by the Japanese. For the yellow tail fin, tailplane and leading wing edges as was on this individual plane I used 71.078 Yellow RLM04. I started with the yellow parts as yellow is hard to use with darker colours beneath. I then masked them off and did the engine cowl. After masking that I did the rest.
The wheels are easy and the ones in the kit is slightly flat at the bottom to reflect the weight of the plane, though just slightly. I think they could have gone further. The propeller is a standard Japanese with silver forwards and black backwards. However the instructions is not clear on this and if you read them you'd think that the backwards side should be silver too.
My end result is at the bottom of the page.
The kit is a good representative of the 'Kate' with a reasonable detailing and the parts fits well together.
| Difficulty* | 3 |
|---|---|
| The good | It's well moulded with detailing on the surface at a good level and with a general good fit to all the parts. |
| The bad | Nothing really bad but nothing very special either. |
*) On a scale 1-5 where 1 is easy and 5 is really hard.
